Mail Merge in Windows
If you want to send bulk documents to a group of people on your email list, then the Mail Merge feature is a quick and simple way to perform this. Every document that is created has the same structure, style, content, and illustrations. It is only customized and different only in a few sections like name, email, address, etc.
Windows OS comes with an integrated mail merge tool that allows you to create custom letters as well as address labels and envelopes. This article will demonstrate to you how to do a mail merge using Windows.
What is Mail Merge?
Mail Merge is a method of creating documents, where each copy is modified with particular information like addresses and names. It can be used to make customized messages for newsletters, brochures, form letters, etc. The benefit of this technique is that you won't have to go through the trouble of manually editing each document. When it comes to sending out bulk mailings, mail merge can be a big time saver.
Create and Print Document using Mail Merge Feature in Windows
There are a total of three files that are involved in the creation of the document with the help of the mail merge feature-
- Template File
This document contains a message like an email or a letter that you will deliver to different person in your mailing list. It has text and visuals (like an image or a logo) that are the same in every copy of the merged file.
- Data File
It is an Excel spreadsheet that acts as a data source that holds a variety of different information such as first name, last name, etc. which will be merged into your created template file in the appropriate location.
- Merged File
This document is the merged result of the template file and the data file. Mail merge creates a customized document for each recipient by taking data from the data file and inserting it into the template file.
Now let's look at the procedures for using mail merge for bulk documents in Windows:
Step 1: Make your Data List in MS Excel
When you perform a mail merge, your Word document and Excel file are linked together, and Microsoft Word automatically pulls the recipient information from the linked excel spreadsheet.
- Launch the Microsoft Office Excel Application and create a Blank Workbook.
- In the first row, enter the column headers (starting from cell A1).
- Enter your contact details as one record per row, beginning with cell A2.
- After finishing the contact sheet, save the Excel document by hitting "Ctrl+S", or by clicking "File > Save, or File > Save As".

- Make sure the field names (or placeholder names) you decide to use in your Word template document exactly match the column headers in your Excel spreadsheet.
- The first sheet of your spreadsheet has all the information that needs to be merged.
- If your Excel file includes percentages, currencies, postal codes, or any other numbers with leading zeros, format them as text so that Word can correctly read their values.
- Before connecting your spreadsheet to your Word mail merge document, any modifications or additions must be done.
Step 2: Make a Mail Merge Document in MS Word

- Launch the Microsoft Word Application and open a new blank document.
- Create the common text that will appear in all mail-merged documents.
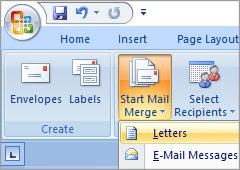
- Click on the "Mailing Tab" and then select "Start Mail Merge" option.
- A drop-down menu appears, in which you will see several mail merge templates such as letters, email messages, envelops, labels and directories.
- Choose any one of the templates of your choice. In this demonstration, we select "Letters" option.
- After selecting the option, you will find that the document shouldn't have undergone any changes.
Step 3: Select the Recipient List
You can now choose the recipients for your letter's mail merge list which can be found in your Excel file.

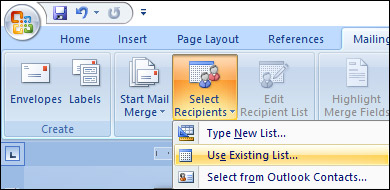
- Click on the "Mailings Tab" and then click "Select Recipients" option.
- A drop-down menu appears, in which you will see three different options, Type New List, Use Existing List and Select from Outlook Contact Options.
- Click on "Use Existing List" option because you have already created an excel file with all the contact details in Step 1.
- A Select Data Source dialog box pops up, find the location where you have saved the excel file, select the file and click on "Open" button.
- A Select Table window screen appears on the screen, select the sheet that contains all the contact details and click on "OK". (Make sure that you have selected the checkbox named as First row of data contains column headers).
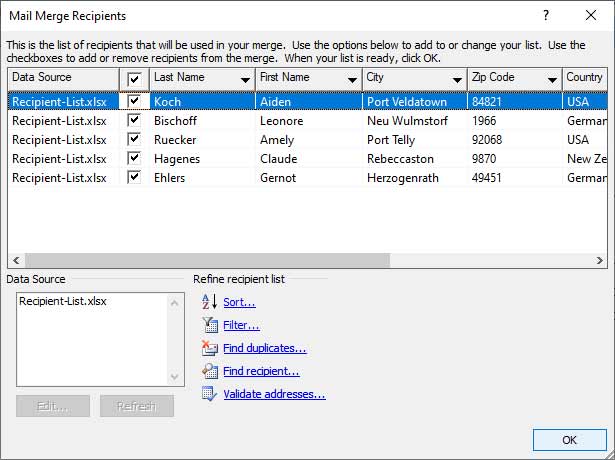
- Click on "Edit Recipient List" option, a Mail Merge Recipients window appears and now, select or deselect checkboxes to add or delete recipients from the mail merge.

Step 4: Insert Customized Message
The next step is to customize the content (like address, email, contact name, etc.) in your Word Mail Merge Document.
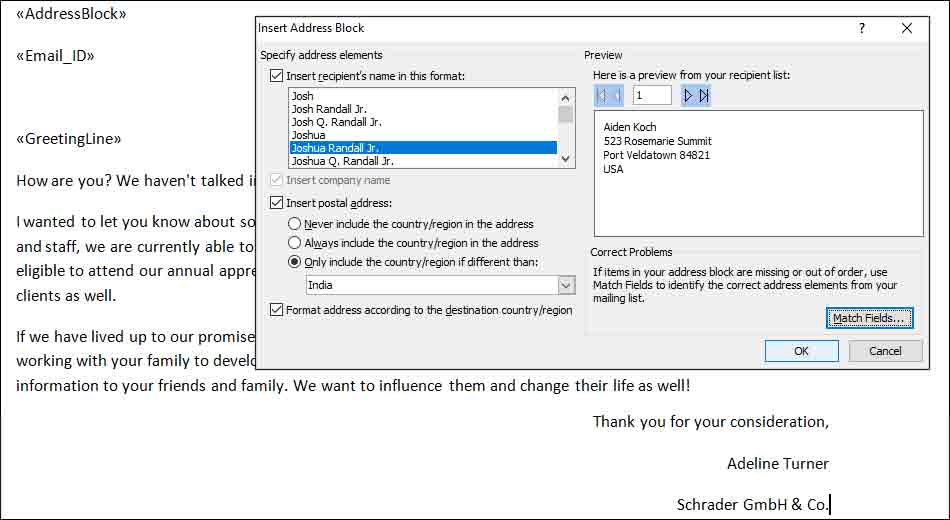
- Click on "Mailing Tab" and you will see a Write & Insert Fields section under the tab. Here, you can see three different inserting options, Address Block, Greeting Line, and Insert Merge Field. Insert Address Block
- In the Write & Insert Fields section, click on the "Address Block" option and choose the address block format that you like and then click on "OK". Insert Greeting Line
- In the Write & Insert Fields section, click on "Greeting Line" option and choose the greeting line format that you like and then click on "OK". Insert Merge Fields
- In the Write & Insert Fields section, click on "Insert Merge Field" option, here you can see different mail merge labels. These merge labels represent the column headers present in your excel sheet.
- Now, select the merge fields that you want to include in your letter.
When you insert the address block, greeting line, and merge fields in your letter, the appropriate placeholders are automatically added to your letter.

Step 5: Preview and Complete the Mail Merge Procedure
After finishing the customization of your letter, you can preview it with the merged excel data before sending it out to the recipients.
- To preview the document, click on the "Mailings tab" and select the "Preview Results" option. You can use the right and left arrows to view how each recipient detail appears in your letter.
- After verifying all the letters, click on "Finish & Merge" option to complete the mail merge procedure.
- When you select this option, you see a drop-down list of three different options-
Edit Individual Documents: Select this option if you want to edit your documents separately.
Print Documents: Select this option if you want to print the merged documents.
Send Email Messages: Select this option if you want to send the merged document as an email message. (In this case, you must manually configure your Outlook or Gmail account with MS Word).
Step 6: Save the Mail Merge Word Document
- After completing the mail merge procedure, now save the merged word document by simply pressing the "Ctrl+S" shortcut key so that you can use it in the future whenever required.
- Your merged word document and excel data file will remain linked after it has been saved.